Pages

Monday 20 December 2010

Healthy Vegetable Bake

It’s been a busy week! It always is before Christmas! And we had loads of snow on Friday and even more on Saturday! This is how I remember Christmas back home! I love snow and it’s nice to trot outside when snow is crunching under my feet and then after a nice and long walk its time for a nice hot drink and some lovely food to keep us warm.

I boiled some new potatoes the other day and had some left over. I though I can warm them up and eat with my lovely marinated Baltic Herring… My
mum, once again, sent me a big bag of goodies, just like every year before 
Marinated Baltic Herring
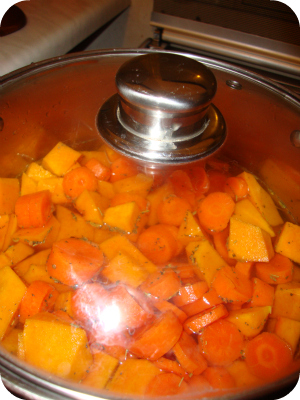
Christmas! But instead of having just that, I ended up with a selection of colourful vegetables which I transformed into a healthy and extremely tasty vegetable bake! I love baking vegetables because they keep the colour and olive oil gives them exceptional shine! You can mix loads of different parts of vegetables and it will always taste great! I Especially love peppers… green… yellow… red… all of them make your food look colourful and fun! They soak in the olive oil but still keep that slight crunchiness!

And the best part of all this is that this dish is low in fat and I guarantee you will not add any extra pounds eating a plate of healthy and juicy vegetable bake, it will comfort you on cold and wintery evenings and will satisfy your stomach and your soul!

My home made healthy vegetable bake

For my vegetable bake I chose:

Vegetable Bake with Cottage Cheese

3 peppers (yellow, green and red)
4 mushrooms
1 courgette
1 pack of baby corn
4-5 boiled potatoes (left over from my lunch)
A little bit of olive oil
200 g of cheese

If you are making a vegetable bake just for yourself you will not need that many ingredients, but I knew it was going to be a large dish because I had my friend coming over and I wanted to have some left for my lunch. But don’t worry if you bake more than you can eat! Just place it into a fridge and it will be perfectly fine for a healthy snack next day!

Before baking my vegetable bake I placed baby corn into a small dish with water and boiled them for a few minutes just to soften them a little bit. I then chopped all the vegetables into chunky bits, placed them into a large baking dish, mixed them well with olive oil, added some mixed spices and placed my colourful baking tray of healthy goodness into preheated oven and roasted for half an hour at 200 – 220 C

Lithuanian Cottage Cheese
I think that a bake is not really a bake without a piece of nice cheese! You can use any kind of cheese for this bake, I think, flaked parmesan would go really well, but I chose cottage cheese my mum sent me from Lithuania. I love this cheese because it’s so versatile! You can eat it with anything, I especially love it with a little bit of jam! Cottage cheese back home is a bit different in taste and it has a cheese shape because it’s pressed hard. Here in UK we get soft cottage cheese in a pot which is also great to mix with different foods. After my vegetable bake was nearly ready I sprinkled small pieces of cottage cheese on top of it and let it roast for approximately 10 minutes. It’s a nice and tasty finish touch!

This vegetable bake is great to eat on its own, with meat or fish. I think it would be great to roast a piece of chicken with it.

I served it with marinated Herring. I thought that salty Herring will balance well with my baked veggies and it certainly did!

I didn’t marinate the Herring this time because it was prepared already. But you can try to marinate a fresh Herring yourselves!


Wednesday 15 December 2010

Evening snacking (4) Carrot, Butternut Squash and Orange Soup

I know… I know… I’ve been writing a lot about soups… but it’s cold outside and I am loving my new blender… and soups are always healthy! Here is one more soup I made some time ago. The taste is unusual, but I like it! It’s different, interesting, sweet and orangey. I just got carried away with all those yellow vegetables and fruit as there is not much sunshine outside at the moment!

Carrot, butternut squash and orange soup

Just like most of other home made soups, this one is easy to make and doesn’t take much time. I only found it difficult to peel and dice my butternut squash as it was pretty big and, I think, my knife wasn’t sharp enough. You can buy pre – cut butternut squash in a supermarket, but I just don’t believe in pre – cut vegetables. They just don’t taste the same…  

I had loads of fun making this soup and was looking forward to its orangey taste. Chopping all these yellow vegetables made me smile all the way, such a bright colour! And the butternut squash smelled like summer!

I have read a few carrot soup recipes before, but I didn’t follow any this time. The ingredients I used:

1 medium size butternut squash (use just half or even less if you don’t want your soup to be too sweet)
4 large carrots
1 large onion
2 cloves of garlic
1 large orange
2-3 cubes of vegetable/chicken stock
Mixed spices
Salt
 
After chopping all the vegetables and sweating the onion for a few minutes with olive oil I placed everything into a large pot and boiled until the vegetables were soft (takes around 30 minutes). Then just crushed in the garlic, grated some orange zest, squeezed in fresh orange juice and liquidised all the ingredients. I served it with a spoon of natural yoghurt which gave the soup an exceptionally creamy texture! You can sprinkle some chopped coriander, but to be honest with you, this is the only herb I can not have in my food! So I would choose fresh parsley!  

My friend suggested that maybe I could make it sweet and spicy and I think that could work well with some chilly... Try it if you want something unusual and healthy!

Sunday 12 December 2010

Love your skin… Almond Goodness


So far I know only one person who dislikes almonds, but if you don't like eating them it doesn’t mean that you can't enjoy their goodness in another way.

I love nuts and always choose them as my snack if I am hungry in between meals or just fancy something nice and crunchy! Eating nuts makes me feel fuller for longer and they are a great ingredient for loads of different dishes! Just add some ground almonds to your curry and it will add that lovely extra texture and flavour! 

Did you know that Almond is not a nut, but it is actually a seed?! It consists of an outer hull and a hard shell with the seed inside.

When I write about something natural and simple I always recall my childhood memories and the way my mum was keeping me and my brother healthy! She would always give us a handful of nuts in a small bowl as a snack to keep us occupied while waiting for a dinner and I always enjoyed it!

I can not begin to describe how healthy almonds are! The health benefits we get are endless! It is used for weight loss, digestive system improvement, to ease constipation, also to lower cholesterol. It’s a great antioxidant, looks after our skin and hair. It is so accessible to everyone and yet we forget about the natural and easy way of staying young and beautiful!

In my previous blog ‘Love your skin’ I shared a little tip of cleaning the face skin and now its time to feed it!  

Almond oil is well-known for treating skin problems such as wrinkles, dark circles under eyes, dry skin, black heads, etc. The oil leaves the skin soft and smooth.

Almond face mask

For healthy and refreshed skin apply once a week the mixture of:

2 table spoons of almond oil
1/5 table spoon of honey
A squeeze of lemon juice

Regular use of almonds prevents early appearance of wrinkles, dryness and improves the blood flow leaving your skin glowing.

Oily skin treatment

Ingredients:

2 table spoons ground almonds
1 table spoon rose water
1/5 table spoon honey

Mix all the above ingredients until the paste is even and carefully apply it to your face skin. Keep it on for about 15 minutes and then rinse it off.

Dry skin treatment

Grind some fresh or use pre-ground almonds and mix them with milk or cream. Apply the mixture to your skin and keep it on for about 20 – 25 minutes. Wipe it off gently with a piece of cotton soaked in warm milk. 

I tried it today, just added a little bit of honey to this mixture just to give my skin even greater natural touch. I absolutely loved it and so did my skin!

Wednesday 8 December 2010

Apple Cider Vinegar

This is something I knew about since I was a little girl… I remember my grandma saying that cider vinegar helps to control our digestion system and also prevent fat build up in our bodies!

She said that when she was 16 she wanted to be slim and therefore had a table spoon of cider vinegar every day.

Back in my grandma’s young days she tried various diets secretly from her mum. She had to eat everything what’s on her plate and that’s why she used natural remedies to keep her slim!

Apple cider vinegar is not only great for our digestive system but it is also beneficial to the health of our hair! A mix of water and cider vinegar keeps it shiny, prevents dandruff and adds more volume!

Hair cleansing remedy:

1/4 cup apple cider vinegar
daily shampoo

The mix of a daily shampoo and cider vinegar should be applied to your hair once a week. Rinse it well to make sure all the vinegar excess is gone. It will prevent dandruff and leave your hair in great condition!  

Hair lotion

1/3 cup apple cider vinegar
1 L water

Place the mixture of water and cider vinegar into an empty spray bottle and use it after shampooing your hair. It might be used instead of leave in conditioner and works really well! No need to rinse it off! Don’t worry about the smell of vinegar as it will go away as soon as you dry your hair!

! It is not recommended to use cider vinegar for coloured or chemically treated hair because it might fade the colour.


Friday 3 December 2010

Delicious Granola Breakfast


My mum used to tell me that breakfast is the most important meal of our day! And I agree with that! Breakfast charges up us well and we don’t feel as hungry before lunch! I remember discussing this topic some time ago with my dear friend back home in Lithuania that we can eat anything we want for breakfast and we will not gain extra weight. I think it is true and I know that I can treat myself to a fresh and soft bun with blueberry (my favourite) jam and I still can stay fit! 


Breakfast gives us energy and we use all the calories we consumed throughout the day!

I enjoy breakfast every morning and having it regularly helps my digestion system work properly! 


I noticed some time ago that having my cereal with milk makes me feel bloated from time to time hence I decided to eat more yoghurt instead and the result is just what I wanted! Yoghurt contains acidophilus bacteria and this friendly bacteria helps to digest most of the food!

Yesterday I ran out of my morning cereal and popped in to one shop close to my work to get some breakfast. It’s a great place to buy food as it is always freshly made, they have a wide range of salads, nice sandwiches, home made food for lunch and my favourite breakfast treat – home made yoghurt with granola. It was absolutely delicious and it got me thinking why I am not making it myself!?

I was so delighted with my breakfast this morning! Granola goes well with yoghurt and honey, it’s crunchy, healthy and easy to make! Fruit and berries are also great for granola breakfast! Let me share my yummy breakfast idea with you! This morning I used:


A handful of granola
3 spoons of natural Greek yoghurt
A good squeeze of honey
1 table spoon of strawberry jam

I just mixed it all together and the breakfast is ready! I like using nice dishes for my meals and I though that a big clear glass will be just perfect for my tasty and creamy breakfast!

Let me say that it’s not only delicious but also very cheap! If you buy 500g of natural Greek yoghurt it will last all week or at least 5 days to make a healthy breakfast and 500g of granola will last for two weeks! And honey… we should all have it in our cupboard! Especially in winter!

We usually forget simple things in life and they are always the best! Experiment with your breakfast because the sky is the limit!

Thursday 2 December 2010

Evening snacking (3)

When it gets as cold as it is at the moment all I can think of is a warm soup. My stomach was growling yesterday for something smooth and creamy, not too heavy and especially something what involves loads of mushrooms… I love mushrooms and it reminds me of my childhood! My mum would store loads of them for the winter time and we would have mushroom feasts every other day!

Mushrooms are low in calories and it is a perfect ingredient for nearly every meal! I love its soft and juicy texture and the fact that they are so easy to prepare! There are so many different meals we can cook using mushrooms or even eat them raw on a piece of bread sprinkled with some oil and herbs!


My late evening snack

It was already late when I started making my mushroom soup. I was waiting for my friend to pop in after work for a chat and decided to make a quick snack for both of us. There are loads of recipes on how to make cream of mushroom soup and most of them involve butter and frying, but I just boiled all the ingredients in a pot and it tasted great! I also added a few potatoes to make it more filling since I served my soup without bread!


Mushroom soup
500g mushrooms
4 medium size potatoes
2 cloves crushed garlic
1 medium onion
2 cubes vegetable or any other flavour stock
Salt and pepper
Dash of olive oil

Place washed and chopped mushrooms, peeled and chopped potatoes and the onion in to a deep pot then add some water, stock and boil all the ingredients for a few minutes until the potatoes are soft.  Add some salt and pepper, crushed garlic and blend it well. Pour it in to your favourite bowl, add a dash of olive oil or natural yoghurt and enjoy it!

My friend loved it and we had a cosy and relaxing, snowy winter evening with a warm bowl of simple but tasty mushroom soup! I even had some for today’s lunch!

Wednesday 1 December 2010

Love your skin...

....and it will love you back!

Finally we had some proper snow in London last night! I am feeling even more Christmassy!

I wanted to write a little bit about skin care. Our skin is amazing and we should look after it all year round! Especially when it cools down outside we must remember that our skin dehydrates because of indoor heating!

However, in the autumn and winter skin care features mostly depend on where we spend most of our time - outdoors or indoors.

Daily cleansing, hydrating and feeding are the main rules of skin care that does not depend on our age or time.
I love little skin care treats but more and more I find myself looking after it in a natural way. I choose my skin care products very carefully, most of them contain natural plant extracts which protect and nourish my skin. I believe that the natural way is the only way to have beautiful and healthy skin.  

I am extremely passionate about my home made products and I love them all, especially ‘avocado face mask’, but yesterday I tried my home made soda facial scrub for the first time and I really liked it! I am always fascinated by how easily and quickly natural beauty treats can be made at home.


Home made soda scrub
I found this tip on one Lithuanian health & beauty website and got really excited to try it out! Although if your skin is not oily don’t use it too much as this scrub can make your skin very dry. But it can be used once or twice a week as an excellent exfoliating facial wash!  Baking soda scrub removes dead skin cells, revitalises and keeps our face and body skin clean and soft.

The way I made it

I just mixed a pinch of soda in my palm with my daily facial wash until it started foaming. Then applied the mixture on to my face, gently massaged it in to my skin and rinsed it off with warm water.

You can also mix it with a little bit of warm water instead of your daily facial wash.    

Soda scrub for complex skin

You will need:

2 spoons of flour
1 tbl spoon of baking soda

Dilute the mixture with a little bit of warm water to make a smooth paste and gently massage it in to your clean skin. Rinse it off with warm water!